
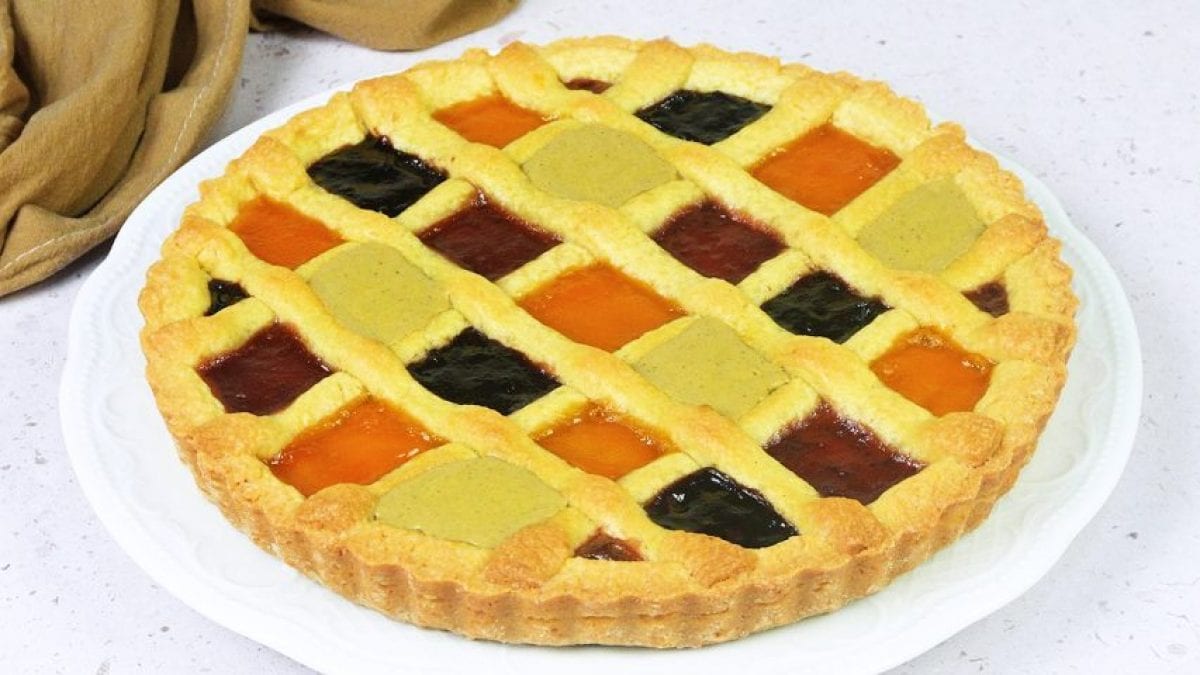
Carnival desserts such as Harlequin Tart are built on a tender pastry base and filled with a patchwork of jams and pistachio cream. The process is simple at heart, just make a dough, chill it, roll it out, create a lattice, and fill each little window with something vibrant and sweet. It’s perfect for festive tables or breakfast with a cup of tea.
What is Harlequin Tart?
The Harlequin Tart takes its inspiration from the iconic Harlequin character of Italian “Commedia dell’arte”, known for wearing a costume made of multicolored diamond patches. That same playful patchwork idea shows up here, but instead of fabric, you get a grid of jewel-toned fillings.
Pro Tips for the Best Harlequin Tart
- Cold butter helps create the right dough texture. If it softens too much, the dough becomes sticky and harder to handle.
- Use a removable-bottom tart pan. It makes unmolding far less stressful and keeps your tart looking neat and intact.
- Warm fillings slightly, not fully. You want them soft enough to pipe, not hot and runny.
- Covering with foil after the first 10 minutes keeps the pistachio cream from over-darkening.
Frequently Asked Questions
Can I use store-bought pastry instead of making it from scratch?
Yes, you can absolutely use store-bought pastry if you’re short on time. However, making it yourself gives you better control over flavor and texture, especially with the added lemon zest. The homemade version also holds the fillings more securely.
Can I swap the jams for other flavors?
This tart thrives on variety, so feel free to experiment with raspberry, blueberry, or even orange marmalade. The key is to pick fillings with contrasting colors so the pattern stands out. Just avoid overly runny jams, as they may bleed into each other.
What if I don’t have a piping bag?
You can use a spoon to carefully fill each section, though it may take a bit more patience. Alternatively, a zip-top bag with a snipped corner works surprisingly well. Precision helps maintain that neat harlequin pattern.
How do I prevent the lattice from sinking?
Make sure the strips are firmly pressed onto the edges and slightly into the base. This helps anchor them in place during baking. Also, avoid overfilling the sections, as excess filling can push the lattice upward.
How to Store Leftovers
Keep the Harlequin Tart at room temperature under a glass dome or covered container for up to 2-3 days to prevent it from drying out. Avoid refrigerating unless necessary, as it can firm up the pastry too much. If you do refrigerate it, let it sit out for a bit before serving.
Ingredients
How to Make Harlequin Tart
;Resize,width=712;)
Add flour, cold butter, sugar, egg, egg yolk, lemon zest, and a pinch of salt into a food processor. Blend until the mixture starts to clump together.
Add flour, cold butter, sugar, egg, egg yolk, lemon zest, and a pinch of salt into a food processor. Blend until the mixture starts to clump together.
;Resize,width=712;)
Transfer to a work surface and knead briefly until smooth. Shape into a ball, wrap, and chill for 2 hours.
Transfer to a work surface and knead briefly until smooth. Shape into a ball, wrap, and chill for 2 hours.
;Resize,width=712;)
Roll the chilled dough into a thin sheet. Fit it into a greased and floured 22cm tart pan. Trim the edges neatly and prick the base with a fork to keep it flat during baking.
Roll the chilled dough into a thin sheet. Fit it into a greased and floured 22cm tart pan. Trim the edges neatly and prick the base with a fork to keep it flat during baking.
;Resize,width=712;)
Use leftover dough to cut thin strips.
Use leftover dough to cut thin strips.
;Resize,width=712;)
Arrange them over the tart to form a grid pattern, pressing gently so they stay in place and create defined sections.
Arrange them over the tart to form a grid pattern, pressing gently so they stay in place and create defined sections.
;Resize,width=712;)
Warm the jams and pistachio cream slightly so they’re easy to pipe and transfer each into separate piping bags. Pipe different fillings into each section, alternating colors to create that signature harlequin pattern. Place the filled tart in the fridge or freezer for at least 1 hour.
Warm the jams and pistachio cream slightly so they’re easy to pipe and transfer each into separate piping bags. Pipe different fillings into each section, alternating colors to create that signature harlequin pattern. Place the filled tart in the fridge or freezer for at least 1 hour.
;Resize,width=712;)
Bake at 180°C (350°F) for 30 minutes. After the first 10 minutes, cover with foil to protect the pistachio cream from overbrowning. Once out of the oven, add a fresh layer of pistachio cream to the sections that need a color boost.
Bake at 180°C (350°F) for 30 minutes. After the first 10 minutes, cover with foil to protect the pistachio cream from overbrowning. Once out of the oven, add a fresh layer of pistachio cream to the sections that need a color boost.
;Resize,width=712;)
Allow the tart to cool completely before removing from the pan and serving.
Allow the tart to cool completely before removing from the pan and serving.
;Resize,width=712;)
Enjoy!
Enjoy!
;Resize,width=767;)
