
Mini Buffet Sandwiches are small and soft leavened products, ideal for serving at a standing buffet, a birthday party, a brunch with friends or a snack with children. Characterized by a neutral and slightly sweet taste, they are perfect for filling with both sweet and savory ingredients: cheeses, cured meats and vegetables, but also jams, preserves, chocolate creams and nut butters.
Preparing them is very simple: just mix brewer's yeast, milk and sugar, add oil, a yolk and an egg, then incorporate the flour and salt, until you obtain a smooth and elastic ball. This is left to rise for a few hours, until it doubles in size, then you proceed to make the rolls: it is essential, in this step, to round them perfectly, so that they keep their shape during cooking. Once brushed with a yolk, beaten with a drop of milk, and left to rest for another hour, they are finally baked in the oven for a few minutes.
What Are Mini Buffet Sandwich?
Mini sandwiches, often referred to as "buffet party sandwiches" in the U.S., have become a staple at gatherings, offering a convenient, bite-sized option for guests to enjoy. These sandwiches trace their origins back to the early 20th century, where they evolved from the classic "finger sandwiches" served during British afternoon teas. However, in America, they gained widespread popularity in the post-World War II era, especially at casual gatherings, buffets, and cocktail parties. Their small, snackable size made them the perfect choice for entertaining a crowd without the need for utensils.
Filled with a variety of ingredients such as deli meats, cheeses, and spreads, these mini sandwiches reflect the American love for creativity in casual food offerings, often featuring regional specialties or favorite flavor combinations. Today, buffet party mini sandwiches are a go-to choice for birthdays, holidays, and office gatherings, celebrated for their versatility, ease of preparation, and ability to cater to diverse tastes.
Pro Tips for The Best Mini Buffet Sandwich
- Ensure your yeast is fresh and active for the best rise. If using dry yeast, proof it in warm water with a pinch of sugar before mixing it into the dough to confirm it's still active.
- Knead the dough just until it’s smooth. Overworking can make the buns tough instead of soft and airy. Let it rest and rise as instructed to allow the gluten to develop naturally.
- Give the dough plenty of time to rise—usually about 1 to 1.5 hours. This step is crucial for light, fluffy buns. If you're short on time, consider placing the dough in a warm, draft-free area to speed up the process.
- For a golden, glossy finish, brush the buns with a little melted butter or an egg wash (a beaten egg with a splash of water) before baking. This will enhance both the texture and flavor of the rolls.
- Place the rolls slightly apart in the baking pan. If they’re packed too tightly, they might bake unevenly and not get that lovely soft, fluffy texture.
- If you're making smaller or larger buns than the recipe suggests, be sure to adjust your baking time. Mini buns will take a little less time to bake—usually around 12–15 minutes.
- Let the buns cool slightly before slicing or assembling your sandwiches. This prevents the fillings from getting soggy and ensures the rolls keep their shape.
Can I Use Ready-Made Bread?
Yes, you can definitely use ready-made bread instead of making the rolls from scratch. Store-bought soft dinner rolls or slider buns are a great option for mini sandwiches. Simply slice them in half and proceed with your desired fillings. While homemade buns provide a fresh, fluffy texture, using pre-made bread saves time and still delivers a delicious result, especially for a casual event.
What Popular Fillings Can I Use?
You can fill the rolls with whatever your pantry and fridge have to offer: in addition to the timeless combination of ham and sliced cheese, much loved by the little ones, try mortadella, salad and tomatoes, but also smoked salmon with cream cheese, canned tuna with a drizzle of mayonnaise … or spread them with a generous amount of chocolate cream, pistachio cream, apricot jam. Let your creativity inspire you and go wild with the most diverse fillings.
How Do I Keep Sandwiches Fresh for a Party Buffet?
To keep your mini buns fresh without filling, allow them to cool completely, then store them in an airtight container or resealable plastic bag. This helps maintain their softness and prevents drying out. If you don't have an airtight container, wrapping the buns in a clean kitchen towel before placing them in a plastic bag works well too. Store them at room temperature if you'll be serving them the next day, or refrigerate them for up to two days.
When it comes to filled mini buns, it’s best to assemble them just before the event to prevent the bread from becoming soggy. If you need to prepare them ahead of time, wrap each sandwich individually in plastic wrap or parchment paper and refrigerate. Choosing fillings that are less moist, like deli meats, cheeses, and thicker spreads, will help keep the buns fresh and prevent them from getting too soggy.
How Many Sandwiches per Person Should I Prepare?
For a buffet or party setting, 2-4 mini sandwiches per person is usually a good guideline, depending on the size of the sandwiches and the variety of other foods available. If there are multiple appetizers or main dishes, you can plan for the lower end of the range, but if the mini sandwiches are the main offering, aim for around 3-4 per person. This ensures everyone gets enough, but it also helps to avoid excess. Adjust based on the crowd size and other food options you plan to serve.
Can I Make These Mini Sandwich Ahead of Time?
Yes, mini sandwiches can definitely be made ahead of time! For the best results, assemble the sandwiches up to 6 hours before the event and store them in the refrigerator. To keep the bread fresh, wrap each sandwich individually in plastic wrap or parchment paper. If you're using moist fillings, like spreads or lettuce, it's best to keep them separate and assemble them just before serving to avoid sogginess. If the sandwiches are simple, with dry fillings like deli meats and cheese, they can be made a day ahead and stored tightly wrapped in the fridge.
Do They Freeze Well?
Yes, mini sandwiches can be frozen, but they freeze best without the fillings. To freeze, assemble the sandwiches, then wrap each one tightly in plastic wrap and place them in an airtight container or freezer bag. If you’re using fillings that may not freeze well, like lettuce or mayo-based spreads, it’s best to add those after thawing. When ready to serve, thaw the sandwiches in the refrigerator overnight and add any fresh ingredients just before serving. This method will help maintain the bread’s texture and flavor.
How to Store Buffet Mini Sandwich
To store any leftover mini sandwiches, place them in an airtight container or wrap them individually in plastic wrap. Keep them in the refrigerator for up to 2-3 days. If the sandwiches have moist fillings, like spreads or vegetables, it's best to remove those fillings to prevent sogginess and store them separately.
Ingredients
How to Make Buffet Mini Sandwich
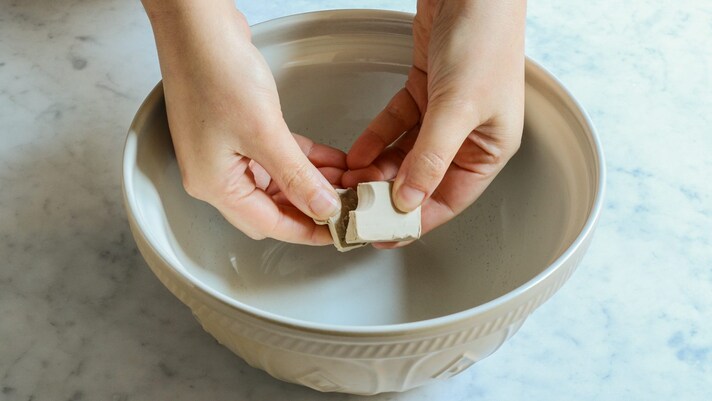
Crumble the yeast into a large bowl, then mix it with the milk at room temperature and the sugar, until it dissolves.
Crumble the yeast into a large bowl, then mix it with the milk at room temperature and the sugar, until it dissolves.
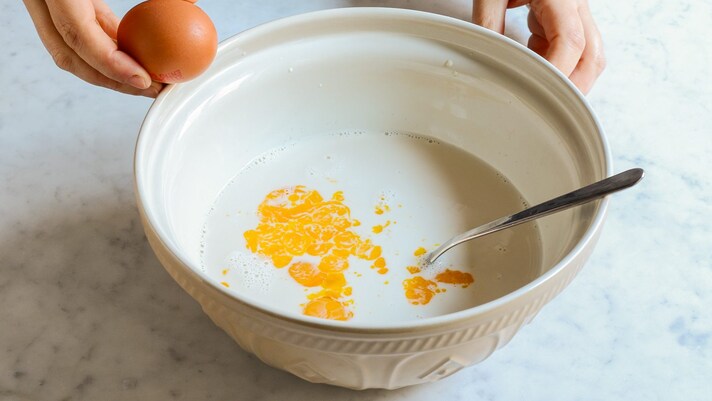
Add the oil, the egg yolk and the whole egg, then continue with the flour and finish with the salt.
Add the oil, the egg yolk and the whole egg, then continue with the flour and finish with the salt.
Work until you get a smooth dough.
Work until you get a smooth dough.
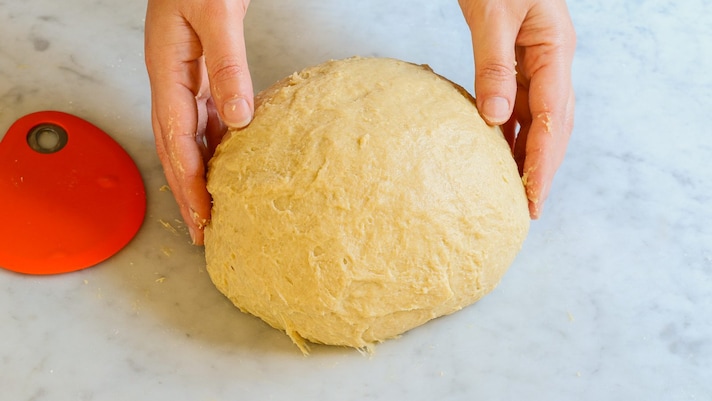
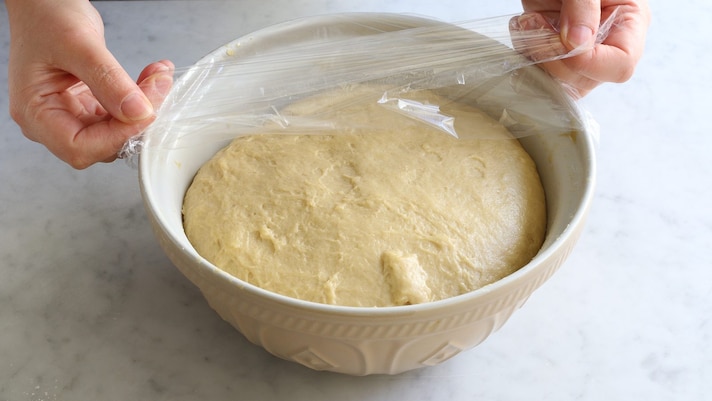
Form a smooth dough and place it in a bowl, covered with a sheet of cling film. Leave it to rise in a warm, dry place free from drafts, for at least 3-4 hours or until it doubles its initial volume.
Form a smooth dough and place it in a bowl, covered with a sheet of cling film. Leave it to rise in a warm, dry place free from drafts, for at least 3-4 hours or until it doubles its initial volume.
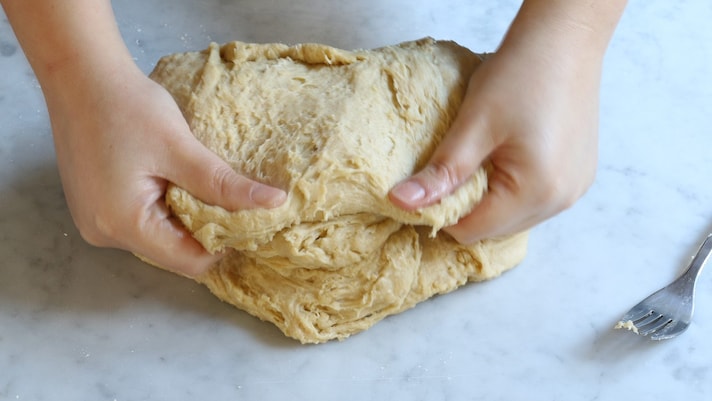
After the necessary time has passed, the dough will appear fluffy and airy; deflate it with the palm of one hand and turn it upside down onto a work surface.
After the necessary time has passed, the dough will appear fluffy and airy; deflate it with the palm of one hand and turn it upside down onto a work surface.
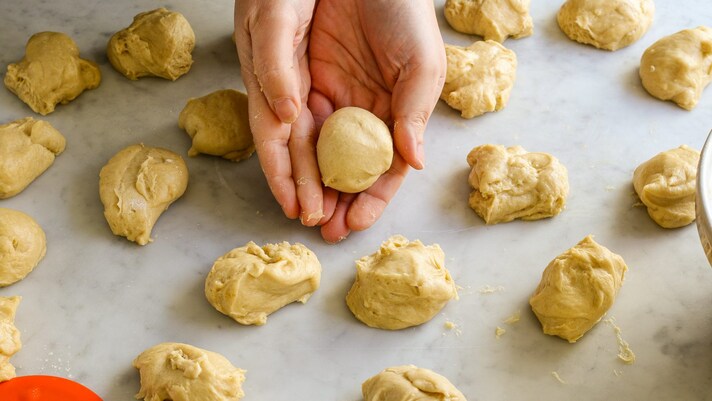
Divide it into portions of about 50 grams each, then shape them between the palms of your hands, rolling them into perfect spheres.
Divide it into portions of about 50 grams each, then shape them between the palms of your hands, rolling them into perfect spheres.
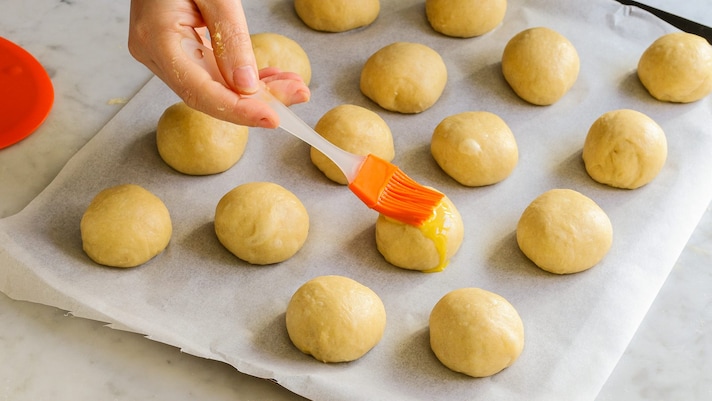
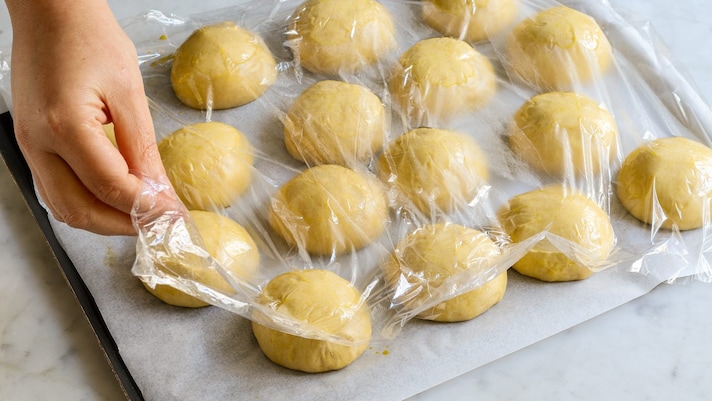
Arrange the rolls, well spaced apart, on a baking tray lined with baking paper, then brush the surface with a mixture of egg yolk and milk. Cover with a sheet of cling film and leave to rise for 1 hour.
Arrange the rolls, well spaced apart, on a baking tray lined with baking paper, then brush the surface with a mixture of egg yolk and milk. Cover with a sheet of cling film and leave to rise for 1 hour.
Gently remove the film and cook in a static oven preheated to 360°F/180°C for approximately 20 minutes.
Gently remove the film and cook in a static oven preheated to 360°F/180°C for approximately 20 minutes.
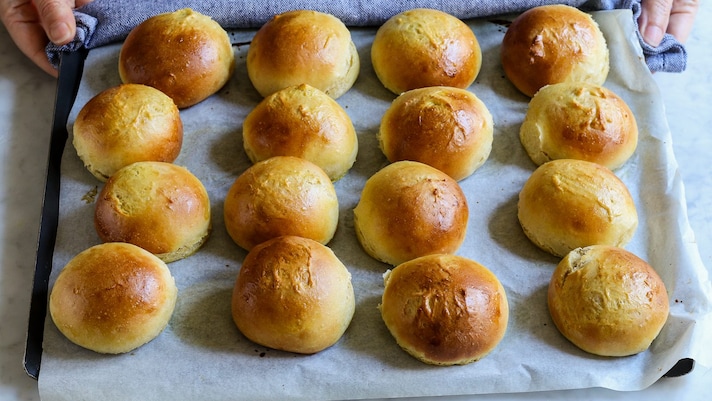
Monitor the cooking and take the rolls out of the oven when they appear golden on the surface, then let them cool completely.
Monitor the cooking and take the rolls out of the oven when they appear golden on the surface, then let them cool completely.

Once cooled, cut the rolls in half and fill them with whatever you prefer: hazelnut spread, cold cuts, cheeses and vegetables.
Once cooled, cut the rolls in half and fill them with whatever you prefer: hazelnut spread, cold cuts, cheeses and vegetables.

Enjoy!
Enjoy!
;Resize,width=767;)
