Royal Icing, also known as royal glaze, is a basic preparation widely used in pastry making to decorate cupcakes, cakes, biscuits, gingerbread and spectacular desserts. It is prepared by whipping together egg whites with powdered sugar and lemon juice, and then varying the proportions depending on the desired consistency.
Here we have made it in 3 different versions: a dense one, perfect for "drawing" on biscuits and creating small sugar creations, a semi-fluid one, obtained by adding a drop of water, and a more liquid one, suitable for frosting sweets of all kinds.
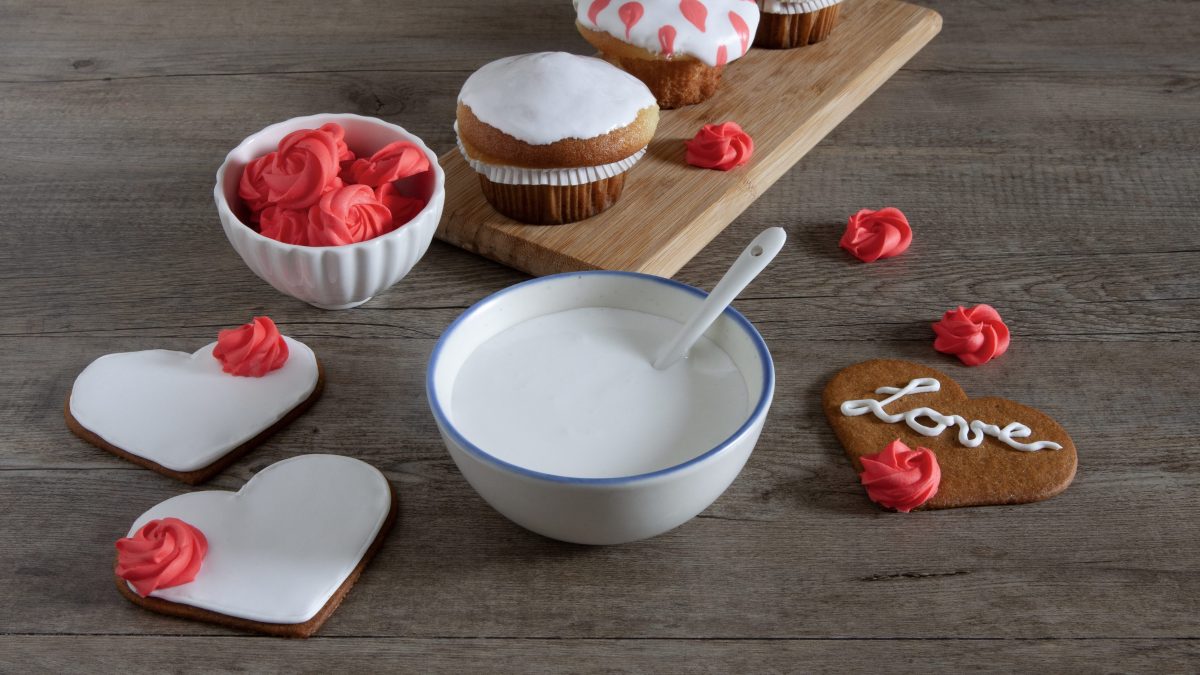
Once ready, it can be used white, natural, or added with food coloring, to be chosen as desired in powder, paste or gel form: taking care, in the latter case, not to exceed the quantities to avoid excessively diluting the mixture.
What is Royal Icing?
Royal icing is a classic confectionery decoration that dates back centuries, with its origins rooted in European royal courts, where it was prized for its elegant appearance and versatility. The name "royal" is believed to have been coined during the 18th century, as the icing gained prominence when it adorned the wedding cakes of royalty and aristocracy. Made from a simple yet effective combination of egg whites, powdered sugar, and occasionally lemon juice, royal icing is celebrated for its smooth texture and ability to harden upon drying. This unique characteristic makes it ideal for intricate decorations, including piping, flooding cookies, and creating ornamental cake designs. Its enduring appeal lies in its versatility and the delicate beauty it brings to baked goods.
How Many Royal Icings Are There?
Royal icing generally comes in three main consistencies, each suited for specific purposes in decorating:
- Stiff Consistency: Used for detailed piping, such as flowers or borders, as it holds its shape well.
- Medium Consistency: Ideal for outlining designs on cookies or cakes.
- Flood Consistency: Thinner and used for filling in outlined areas or creating smooth surfaces.
These variations are achieved by adjusting the amount of liquid in the recipe, making royal icing incredibly versatile for decorators. Here, we will explain to you how to make all three types of royal icing!
Pro Tips for the Best Royal Icing
- Sifting powdered sugar is highly recommended, as it eliminates lumps and ensures a silky, lump-free icing.
- Overmixing can introduce air bubbles, making the icing harder to work with.
- Add water or lemon juice drop by drop to thin the icing or more sugar to thicken it.
- Keep unused icing covered with a damp cloth to prevent it from drying out.
- Work in a cool, dry environment to avoid humidity affecting the icing’s texture.
- Even small amounts of grease can prevent the icing from setting properly, so work with clean tools and clean surfaces.
Royal Icing vs. Regular Icing
Royal icing is made from egg whites (or meringue powder) and powdered sugar, giving it a smooth texture that hardens when dried, making it ideal for intricate decorations and sturdy designs. In contrast, regular icing, such as buttercream or glaze, typically uses ingredients like butter, cream, or milk and remains soft and creamy, perfect for spreading or piping but not suitable for detailed work that requires hardening.
What Does Royal Icing Taste Like?
Royal icing has a sweet, sugary taste with a hint of vanilla or lemon, depending on the flavoring used. Its primary sweetness comes from the powdered sugar, while the egg whites or meringue powder add no noticeable flavor. The result is a clean, light sweetness that complements baked goods without overpowering them.
Help! Why Did my Royal Icing Get So Hard?
Royal icing can become too hard if it's overmixed or if the recipe contains too much powdered sugar relative to the liquid. Its natural property is to harden as it dries, but over-drying or exposure to air for too long can make it excessively brittle.
How Do I Keep My Royal Icing From Going Stiff Too Soon?
To keep royal icing from getting too hard too soon place a damp cloth or plastic wrap directly on the surface of the icing when not in use. Moreover, prepare only as much as you can use in a session to prevent prolonged exposure to air.
If you're in a dry environment, adding slight humidity can slow the drying process.
Can I Use Something Else Instead of Egg Whites?
Yes, you can use meringue powder or powdered egg whites as substitutes for fresh egg whites in royal icing. These alternatives are safer, more convenient, and provide the same structure and hardening properties. They’re especially useful for avoiding the risks associated with raw eggs while achieving the perfect icing consistency.
What Can I Use Royal Icing For?
It can be used for decorating cookies with intricate designs, outlining, and flooding. It’s also perfect for creating detailed cake embellishments like flowers and lace, assembling and decorating gingerbread houses, and adding personalized lettering or monograms. Its hardening property makes it ideal for long-lasting, professional-looking decorations.
What Are the Best Tools to Pipe Royal Icing?
The best tools for piping royal icing include piping bags, which can be disposable or reusable and provide excellent control for detailed work. Piping tips of various sizes and shapes are essential, with round tips ideal for lines and writing, and star tips perfect for flowers and textured designs. Couplers are handy for switching tips without needing to change the bag, adding convenience to the decorating process. Additionally, a scribe tool or toothpick is useful for fine adjustments and smoothing intricate details, ensuring professional-quality results.
Can You Make Royal Icing Ahead of Time?
You can! Store it in an airtight container with a piece of plastic wrap pressed directly onto the surface to prevent it from hardening. It can last up to a week at room temperature or longer in the refrigerator. Before use, rewhip it to restore its consistency.
Can You Freeze Royal Icing?
You can! Place it in an airtight container or freezer bag, ensuring there’s no air exposure, and freeze for up to 2-3 months. Thaw it in the refrigerator and rewhip to restore its smooth consistency before use.
How to Store Royal Icing
Royal icing can be stored in the fridge, covered with cling film in contact, for 2-3 days maximum. When using it, we suggest you whip it briefly with an electric whisk and add, if it has lost consistency, a little sifted icing sugar. Once solidified, it can be stored for at least 1 week.
Ingredients
How to Make Royal Icing (3-Ways)
How to Make Stiff Royal Icing

Start by sifting the powdered sugar into a bowl.
Start by sifting the powdered sugar into a bowl.

Start working the egg whites with an electric whisk, at medium speed, until you obtain a frothy consistency.
Start working the egg whites with an electric whisk, at medium speed, until you obtain a frothy consistency.

At this point, add the sifted icing sugar, little by little, always continuing to whisk.
At this point, add the sifted icing sugar, little by little, always continuing to whisk.

Finish with lemon juice and still work briefly.
Finish with lemon juice and still work briefly.

At the end, you should obtain a compact, dense, shiny royal icing that sticks well to the whisks.
At the end, you should obtain a compact, dense, shiny royal icing that sticks well to the whisks.
;Resize,width=712;)
Transfer the royal icing into a piping bag with a small nozzle, trim the edges of the biscuits and draw some writing inside: let the biscuits dry for at least 20 minutes before filling them with the more fluid icing.
Transfer the royal icing into a piping bag with a small nozzle, trim the edges of the biscuits and draw some writing inside: let the biscuits dry for at least 20 minutes before filling them with the more fluid icing.
How to Prepare Semi-Fluid Royal Icing

Prepare the semi-fluid royal icing by whipping, as for the dense one, the egg whites with the icing sugar and the lemon juice, and then adding a drop of water: 15 to 25 ml, depending on the desired consistency.
Prepare the semi-fluid royal icing by whipping, as for the dense one, the egg whites with the icing sugar and the lemon juice, and then adding a drop of water: 15 to 25 ml, depending on the desired consistency.

Once ready, the icing should slowly drip from the spoon. To check the correct consistency, we suggest you make a slit in the center of the mixture with a knife: if the slit is completely covered within 10 seconds, the icing is ready.
Once ready, the icing should slowly drip from the spoon. To check the correct consistency, we suggest you make a slit in the center of the mixture with a knife: if the slit is completely covered within 10 seconds, the icing is ready.

Using a piping bag, fill the inside of the biscuits with the semi-fluid icing and let them dry for at least 24 hours.
Using a piping bag, fill the inside of the biscuits with the semi-fluid icing and let them dry for at least 24 hours.
How to Make Fluid Royal Icing

To ice cupcakes and desserts of all kinds, prepare the fluid royal icing using egg whites and sugar in a ratio of 2:1 and then proceed in the same way, always whipping the ingredients with the whisks and finishing with 2 teaspoons of lemon juice.
To ice cupcakes and desserts of all kinds, prepare the fluid royal icing using egg whites and sugar in a ratio of 2:1 and then proceed in the same way, always whipping the ingredients with the whisks and finishing with 2 teaspoons of lemon juice.

Once ready, the icing will slide off the spoon very quickly.
Once ready, the icing will slide off the spoon very quickly.

Cover the cupcakes with the runny icing, helping yourself with a teaspoon and let them dry for at least 6 hours.
Cover the cupcakes with the runny icing, helping yourself with a teaspoon and let them dry for at least 6 hours.
How to Make Colored Royal Icing

To make small sugar creations, add a few drops of gel food coloring to the thicker royal icing, using your favorite color.
To make small sugar creations, add a few drops of gel food coloring to the thicker royal icing, using your favorite color.

Mix thoroughly with a spoon and, if necessary, add more food coloring until you get the desired shade.
Mix thoroughly with a spoon and, if necessary, add more food coloring until you get the desired shade.

Collect the colored royal icing in a piping bag with a star-shaped nozzle and draw lots of sugar roses on a baking tray lined with parchment paper; then, let them dry perfectly and then use them as desired to decorate cupcakes, cakes and biscuits.
Collect the colored royal icing in a piping bag with a star-shaped nozzle and draw lots of sugar roses on a baking tray lined with parchment paper; then, let them dry perfectly and then use them as desired to decorate cupcakes, cakes and biscuits.

Enjoy your glazed desserts!
Enjoy your glazed desserts!
;Resize,width=767;)
