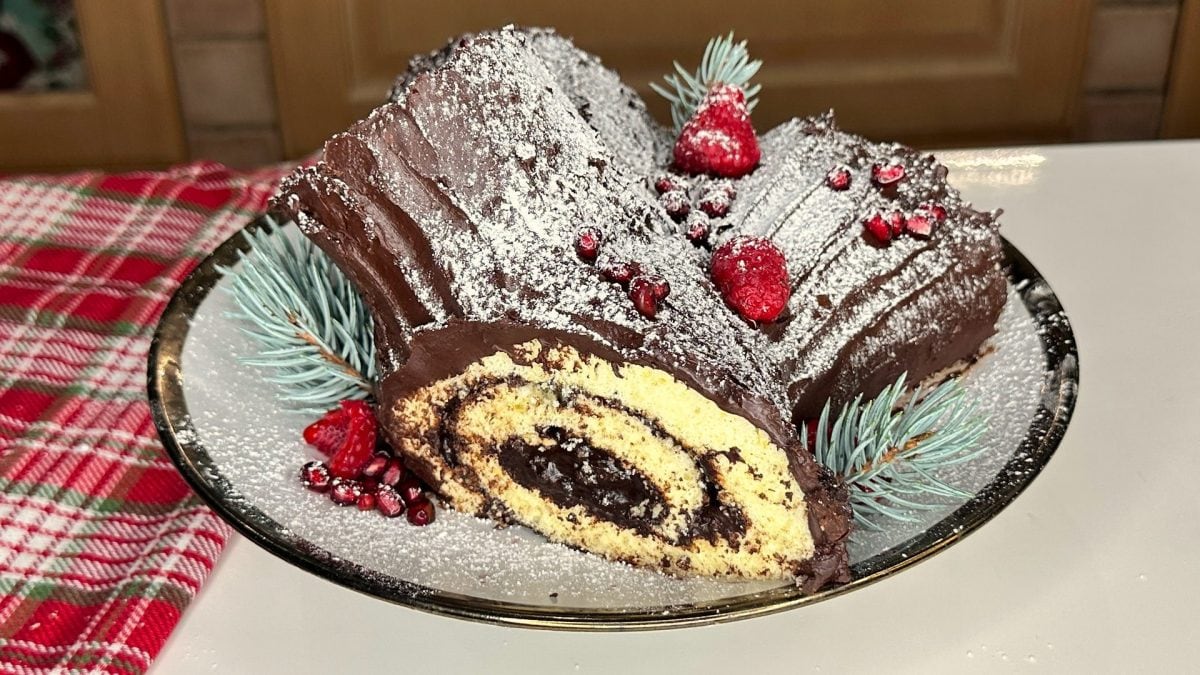
The Yule Log Cake, also known as Bûche de Noël (pronounced as boosh duh no-el), is a scenic and delicious Christmas dessert. Of French origin, it owes its name to its characteristic shape that resembles a log of wood , a symbol of prosperity in Northern European countries. In ancient times, in fact, during the winter solstice celebration (Yule), burning a log was a propitiatory rite to wish for abundance and fertility in the harvests of the year to come. Soft, creamy and with an enveloping flavour, the Yule log is ideal for ending Christmas Eve dinner or Christmas lunch on a sweet note, winning over young and old alike.
Making it at home is easier than you might think: you start by preparing the biscuit dough, a soft base that cooks in the oven in a few minutes, which is rolled up while still hot and wrapped in cling film, to obtain the typical cylindrical shape, preventing it from crumbling. Once cooled, it is unrolled and filled with a rich chocolate ganache, prepared by mixing dark chocolate and hot cream, until you obtain a smooth and velvety cream. The roll is then cut into three pieces, assembled to form a log complete with "branches" and decorated with the remaining ganache to reproduce the appearance of bark. Finally, it is garnished with raspberries, pomegranate seeds, rosemary and a sprinkling of powdered sugar, to simulate snow.
The result is a perfect dessert to serve at the end of a meal, but also as a snack, perhaps accompanied by a hot tea or a spiced infusion.
What is Bûche de Noël?
The Bûche de Noël, or Yule log cake, is a traditional French dessert with roots in ancient European midwinter celebrations. Long before ovens and cakes, the Yule log was a large piece of wood burned in the hearth as part of a solstice ritual, symbolizing warmth and light during the darkest days of the year. This tradition evolved, and by the 19th century, as hearths were replaced by smaller stoves, the actual log became obsolete.
French pastry chefs ingeniously transformed the custom into a festive dessert by creating a sponge cake rolled with rich fillings like buttercream or ganache, resembling a log. Often decorated with edible meringue mushrooms, powdered sugar “snow,” and chocolate bark, the cake captured the spirit of the Yule log while adding a touch of culinary artistry. Today, the Bûche de Noël is a symbol of holiday cheer, celebrated not just in France but worldwide, blending tradition and indulgence.
Pro Tips for The Best Bûche de Noël
- Beat the eggs and sugar until the mixture is pale and fluffy. This step is crucial for a light and airy sponge cake.
- Spread the batter evenly on the baking sheet to ensure a uniform thickness, and avoid overbaking to keep the sponge pliable for rolling.
- Roll the cake gently in a clean kitchen towel or parchment paper while it's still warm to prevent cracks. Let it cool in this shape before filling.
- Allow the filled roll to set in the refrigerator before frosting or decorating, which helps it hold its shape.
- Spread chocolate ganache unevenly for a textured, bark-like appearance. A fork or knife can add naturalistic details.
- Remove from the refrigerator 15-20 minutes before serving to allow the flavors and textures to shine.
Swiss Rolls Vs. Bûche de Noël
A Swiss roll is a simple rolled sponge cake filled with cream, jam, or frosting, often served as an everyday dessert. A Yule log (Bûche de Noël), on the other hand, is a festive version of a rolled cake, decorated to resemble a log, complete with chocolate frosting for "bark" and seasonal decorations like powdered sugar "snow." While both share a similar base, the Yule log is more elaborate and traditionally associated with Christmas celebrations.
How Do I Keep My Bûche de Noël From Cracking?
To prevent your Bûche de Noël from cracking, roll the sponge cake gently while it's still warm and pliable, using a clean kitchen towel or parchment paper. Let it cool in the rolled shape before adding the filling. Overbaking the sponge can cause it to dry out and crack, so keep a close eye on baking time for a soft, flexible texture.
How Can I Decorate the Yule Log?
To decorate a Yule log (Bûche de Noël), spread chocolate ganache or buttercream over the rolled cake to mimic tree bark. Use a fork to create bark-like ridges, and dust with powdered sugar for a snowy effect. Add edible decorations like meringue mushrooms, sugared cranberries, or holly leaves for a festive touch. Finish with a light sprinkle of cocoa powder for a rustic, woodsy look.
Can I Make The Yule Log in Advance?
Yes, a Yule log can be made in advance! Prepare and assemble the cake up to 1-2 days ahead, then store it in the refrigerator, covered to prevent drying out. Add final decorations, like powdered sugar or fresh garnishes, just before serving for the best presentation.
Can The Bûche de Noël Be Frozen?
Sure! Wrap the assembled and undecorated cake tightly in plastic wrap and then foil to prevent freezer burn. Freeze for up to 3 months. Thaw in the refrigerator overnight, then add decorations before serving for the freshest appearance.
How to Store Bûche de Noël
It can be stored in the refrigerator for 2 days, well covered with cling film.
Ingredients
How to Make Bûche de Noël

Shell the eggs, separating the whites from the yolks, and collect the latter in a bowl with the granulated sugar.
Shell the eggs, separating the whites from the yolks, and collect the latter in a bowl with the granulated sugar.

Beat the egg yolks with an electric whisk at high speed until they are light and frothy.
Beat the egg yolks with an electric whisk at high speed until they are light and frothy.

Beat the egg whites until stiff with the remaining sugar.
Beat the egg whites until stiff with the remaining sugar.

Gradually incorporate the egg whites into the yolks, mixing with a spatula and making movements from the bottom upwards so as not to deflate them.
Gradually incorporate the egg whites into the yolks, mixing with a spatula and making movements from the bottom upwards so as not to deflate them.

At this point, pour in the sifted all-purpose flour and a pinch of salt, then continue mixing gently, until you obtain a smooth, airy and homogeneous mixture.
At this point, pour in the sifted all-purpose flour and a pinch of salt, then continue mixing gently, until you obtain a smooth, airy and homogeneous mixture.

Spread the mixture on a large baking tray lined with parchment paper and level it with the back of a spoon to a thickness of about 1 centimeter, then cook in a static oven preheated to 360°F/180°C for 8-10 minutes: it should be lightly golden.
Spread the mixture on a large baking tray lined with parchment paper and level it with the back of a spoon to a thickness of about 1 centimeter, then cook in a static oven preheated to 360°F/180°C for 8-10 minutes: it should be lightly golden.

Remove the biscuit dough from the oven and turn it upside down while still hot onto a second sheet of parchment paper, then add some sugar to the surface and cover with cling film. This way the base will stay moist.
Remove the biscuit dough from the oven and turn it upside down while still hot onto a second sheet of parchment paper, then add some sugar to the surface and cover with cling film. This way the base will stay moist.

Roll up the biscuit dough tightly, helping yourself with the parchment paper.
Roll up the biscuit dough tightly, helping yourself with the parchment paper.

Wrap it in cling film, close the ends and let it cool, so that it can take its shape without breaking in the subsequent stages of the recipe.
Wrap it in cling film, close the ends and let it cool, so that it can take its shape without breaking in the subsequent stages of the recipe.

Meanwhile, prepare the chocolate ganache: heat the cream, bringing it to about 170°F/80°C.
Meanwhile, prepare the chocolate ganache: heat the cream, bringing it to about 170°F/80°C.

Turn off the heat and add the chopped dark chocolate.
Turn off the heat and add the chopped dark chocolate.

Then mix with a whisk until it melts completely, and let it cool.
Then mix with a whisk until it melts completely, and let it cool.

When the base and the cream are very cold, delicately unroll the biscuit dough and spread a little more than half the ganache; you will need the rest of the cream for the final decoration.
When the base and the cream are very cold, delicately unroll the biscuit dough and spread a little more than half the ganache; you will need the rest of the cream for the final decoration.

Wrap the roll and carefully remove the cling film.
Wrap the roll and carefully remove the cling film.

Once the necessary time has passed, divide the roll into three portions by making oblique cuts: leave the central part longer, which will act as the main trunk, and even out the edges, eliminating any irregularities.
Once the necessary time has passed, divide the roll into three portions by making oblique cuts: leave the central part longer, which will act as the main trunk, and even out the edges, eliminating any irregularities.

Use the chocolate ganache as glue for the two side logs, spreading the base generously.
Use the chocolate ganache as glue for the two side logs, spreading the base generously.

Decorate the entire surface with the remaining ganache, distributing it irregularly to simulate the bark of a tree: you can help yourself with a round-tipped knife or with the back of a teaspoon.
Decorate the entire surface with the remaining ganache, distributing it irregularly to simulate the bark of a tree: you can help yourself with a round-tipped knife or with the back of a teaspoon.

Finally, garnish with raspberries and pomegranate sprinkled with an impalpable layer of icing sugar.
Finally, garnish with raspberries and pomegranate sprinkled with an impalpable layer of icing sugar.

Enjoy!
Enjoy!


