
Let’s talk about cookies, specifically, the kind that shows up in that iconic blue tin, mysteriously repurposed as your grandma’s sewing kit. Today, we’re making those at home. No, you don’t need fancy equipment or a Danish passport. Just a few pantry staples, a smidge of patience, and the willingness to knead, roll, and snack your way to victory.
These cookies are a sweet little appetizer and it’s the kind of baking project that sounds complicated, but it’s more play than work.
What Are Danish Cookies, Really?
Danish cookies, or "småkager" as they’re known in Denmark, are a traditional treat dating back centuries. The name "småkager" literally means "small cakes," which is oddly accurate for these tidy little rounds. Their roots stretch into the cozy kitchens of Denmark.
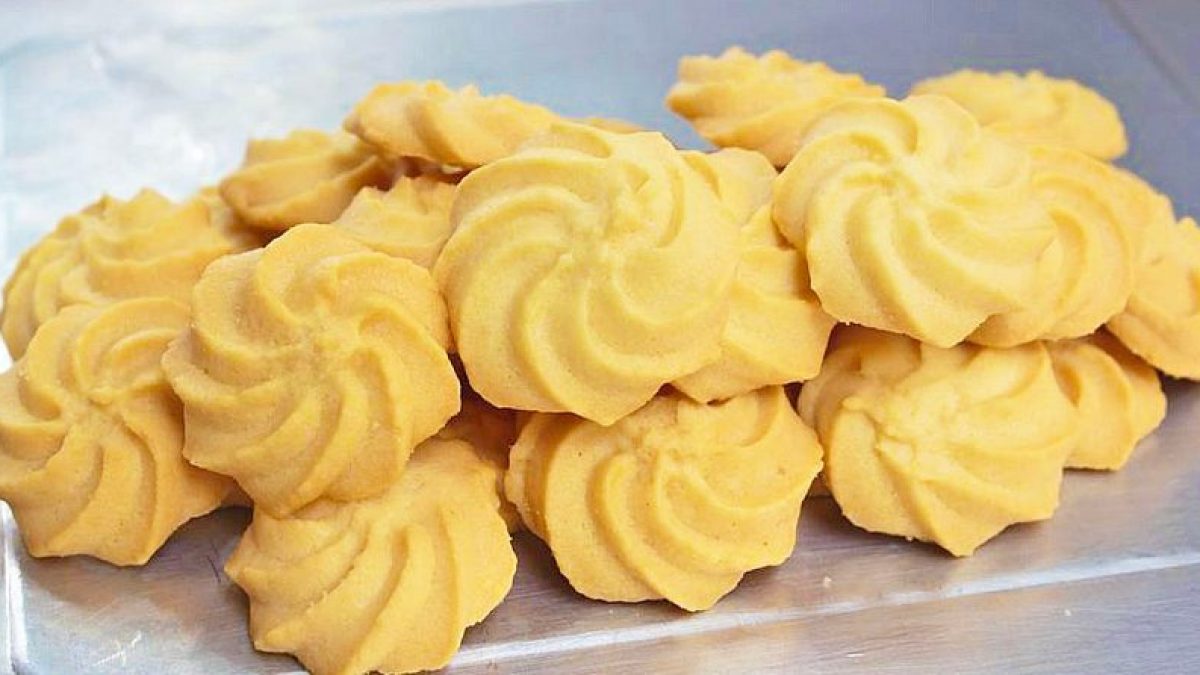
What sets these cookies apart is their slightly sandy texture and rich flavor profile, often spiced up with a bit of cardamom or citrus zest. The cookies in the tin are often shaped differently to indicate different textures and flavors, a sort of edible Morse code.
What's The Difference Between Shortbread and Danish Cookies?
Shortbread is a traditional Scottish treat made with just butter, flour, and sugar—resulting in a dense, crumbly, melt-in-your-mouth texture. Danish cookies, on the other hand, include eggs and sometimes milk or vanilla, which gives them a lighter, crispier bite and more flavor complexity. While shortbread is simple and buttery, Danish cookies often come in piped shapes and are sweeter with decorative touches like sugar or raisins.
Pro Tips for The Best Danish Cookies
- Once the dough comes together, step away. Overworking it can make the cookies tough.
- Try different shapes before baking. Roll, slice, or pipe until you get variety with the same dough.
- These cookies go from golden to too-toasty quickly. Keep an eye out.
- A sprinkle of cinnamon, a drizzle of chocolate, or a touch of lemon zest won’t hurt.
Do I Have to Use Raisins?
Nope! The raisins are totally optional. You could sub in mini chocolate chips, chopped nuts, or even dried cranberries. Or leave them out altogether if you're a purist. Just keep the quantity modest so the dough doesn’t get overwhelmed.
What Kind of Butter Works Best?
Go for unsalted, high-fat European-style butter if you can get your hands on it. It lends a richness that takes these cookies up a notch. But honestly, any decent unsalted butter will work just fine.
Why Chill the Dough?
Chilling the dough makes it easier to handle and helps solidify the fat, which means your cookies won’t spread into flat puddles in the oven. It also deepens the flavor, a little nap does wonders.
Can I Make These Without a Piping Bag?
Yes! If piping sounds too fussy, just roll and slice the dough instead. You'll still get all the flavor, minus the fancy swirl. You can even use a cookie press if you want to get decorative.
How Long Do They Last?
Stored in an airtight container, these cookies will stay crisp and delightful for up to two weeks. If they soften, a quick toast in a low oven brings them right back to life.
What If I Don’t Have Parchment Paper?
Grease your baking tray lightly or use a silicone mat. Parchment just makes cleanup a dream and prevents sticking, but it's not a deal-breaker.
Why Are My Cookies Spreading Too Much?
That could be due to warm dough, soft butter, or an overly hot oven. Make sure you chill the dough and double-check your oven temp with an oven thermometer.
Ingredients
How to Make Danish Cookies
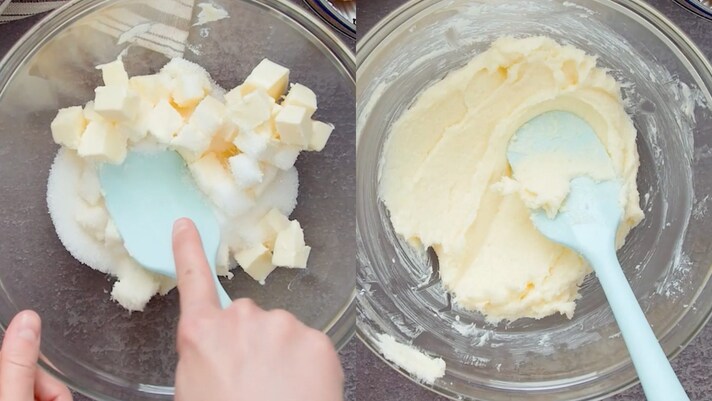
In a large bowl, whisk together the flour, sugar, and salt. Cube the butter and mix it into the flour mixture.
In a large bowl, whisk together the flour, sugar, and salt. Cube the butter and mix it into the flour mixture.
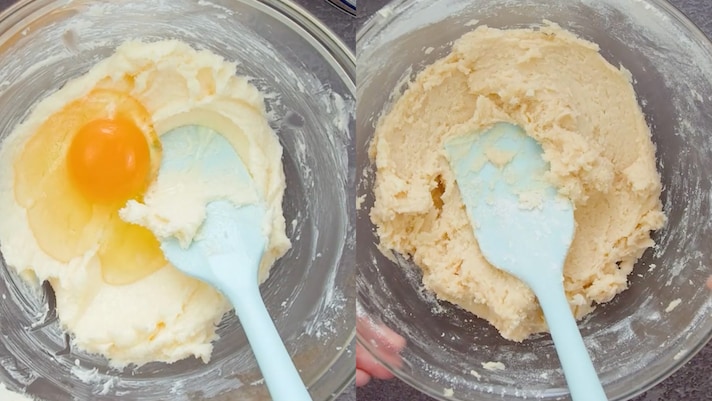
Crack in the egg and knead the dough until it comes together.
Crack in the egg and knead the dough until it comes together.

Cut the dough into four equal parts, set aside one quarter and knead in the raisins. Keep the rest plain for rolling and piping. Roll three parts of the dough into logs using parchment paper to guide you.
Cut the dough into four equal parts, set aside one quarter and knead in the raisins. Keep the rest plain for rolling and piping. Roll three parts of the dough into logs using parchment paper to guide you.
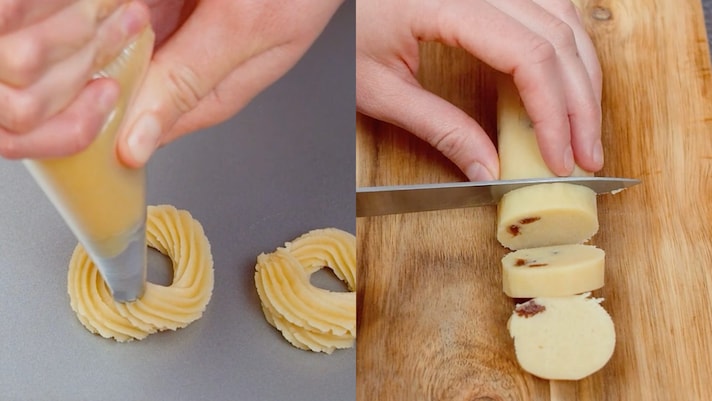
Pipe the remaining quarter into swirly shapes onto a lined baking sheet. Refrigerate all the shaped dough for at least 30 minutes. This firms it up and keeps your cookies looking cute. Once chilled, slice the logs into even disks.
Pipe the remaining quarter into swirly shapes onto a lined baking sheet. Refrigerate all the shaped dough for at least 30 minutes. This firms it up and keeps your cookies looking cute. Once chilled, slice the logs into even disks.
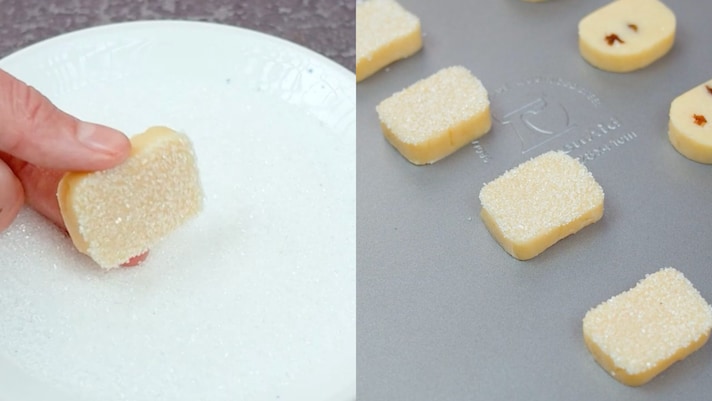
Dip some in sugar and arrange on a baking tray with some room in between.
Dip some in sugar and arrange on a baking tray with some room in between.
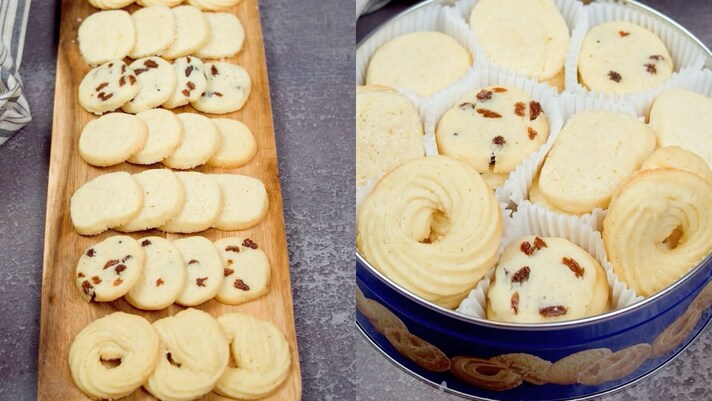
Bake at 180°C/350°F for 12–15 minutes until just golden around the edges. Mix the shapes on a plate for that blue tin variety look and serve.
Bake at 180°C/350°F for 12–15 minutes until just golden around the edges. Mix the shapes on a plate for that blue tin variety look and serve.
;Resize,width=767;)
